
TL;DR:
- Make.com is a free automation tool that connects your apps and runs workflows automatically
- You can build a 5-module scenario that writes full blog posts from a single keyword
- You need a Make.com account, OpenAI API credits, and a WordPress site to follow this tutorial
- The whole setup takes about 2-3 hours the first time and runs in under 5 minutes after that
- Cost per blog post generated: roughly $0.05-0.10 in OpenAI API credits
I’ll be honest with you — I spent weeks trying to figure out how to use Make.com. Every tutorial I found assumed you already knew what you were doing, and I kept getting stuck on the same questions. What goes where? Why isn’t it connecting? What even is a module?
So I’m writing the tutorial I wish I had. This is exactly how I set up my automated blog creation scenario, including every mistake I made along the way and how to fix them.
By the end of this post you’ll have a working Make.com scenario that takes a keyword from a Google Sheet and turns it into a full WordPress draft — automatically, while you sleep.
This post may contain affiliate links. I may earn a small commission at no extra cost to you.
If you are wondering what niche to choose for your blog, see my blog about building passive income online. I explain how to perform market research to choose a high performing niche and blog topics that people are actually searching for. 🙂
What is Make.com and Why Should You Care
Make.com (formerly called Integromat) is a visual automation platform. Think of it like a digital conveyor belt — you set it up once, tell it what to do at each step, and it runs automatically every time you trigger it.
For bloggers, this means you can automate the most time-consuming part of content creation: the writing itself. Instead of spending 3-4 hours writing a blog post from scratch, you add a keyword to a spreadsheet and Make does the rest — generating an outline, writing the full post, and dropping it into WordPress as a draft ready for your review.
Make.com has a free plan that gives you 1,000 operations per month which is more than enough to get started. When you’re ready to scale, paid plans start at around $9-16 per month.
One important thing to understand before we dive in: Make.com is not ChatGPT. It does not have AI built in. Make is the automation plumbing — it connects your apps and passes data between them. The actual AI writing comes from the OpenAI API, which is a separate account with separate billing. I’ll explain exactly how to set both up.
What You Need Before You Start
Before you build anything in Make, get these four things ready:
1. A Make.com account
Go to make.com and sign up for free. No credit card required to start.
2. An OpenAI API account with credits
This is different from a ChatGPT subscription. Go to platform.openai.com and create an account. Then go to Settings → Billing and add $5-10 in credits. This is what powers the actual writing. At roughly $0.05-0.10 per blog post you have enough to generate 50-100 posts on a $5 top-up.
3. A Google Sheet set up as your content queue
Create a new Google Sheet called “Blog Topics” with three columns:
- Column A: Keyword
- Column B: Category
- Column C: Status
That’s it. This is your control panel. Every row you add becomes one blog post.
4. A WordPress site with the Make connector plugin installed
Go to your WordPress admin (yoursite.com/wp-admin) → Plugins → Add New → search “Make Connector” → Install and Activate. This gives Make permission to create posts on your site.
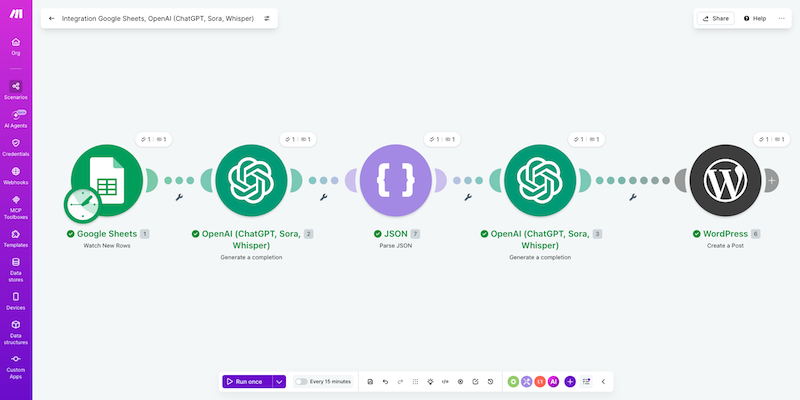
Understanding the 5-Module Scenario
Your automation has five steps that chain together like a relay race. Here’s what each one does before we build it:
Module 1 — Google Sheets: Watch New Rows
This is your trigger. Every time you add a new row to your Google Sheet, Make wakes up and starts the scenario.
Module 2 — OpenAI: Generate Outline
Make sends your keyword to OpenAI’s gpt-4o-mini model and asks it to create a structured blog post outline in JSON format — including the title, meta description, H2 headings, and an opening hook.
Module 3 — JSON Parse: Read the Outline
This module reads the JSON data from Module 2 and turns it into individual variables Make can use — like pulling the title out separately so it can be mapped to the WordPress title field.
Module 4 — OpenAI: Write the Full Post
Make sends the outline from Module 2 to OpenAI’s gpt-4o model (the more powerful one) and asks it to write a complete blog post in HTML format.
Module 5 — WordPress: Create Draft Post
Make takes the finished post and creates a new draft in your WordPress site, filling in the title, content, and excerpt automatically. It saves as a draft — never published — so you can review and edit before anything goes live.
Step 1: Connect Your Google Sheet
- Log into Make.com and click Create a new scenario
- Click the big + circle in the center of the canvas
- Search Google Sheets and select it
- Choose Watch New Rows as the trigger
- Click Add next to Connection and log into your Google account
- Select your “Blog Topics” spreadsheet and Sheet1
- Set Table contains headers to Yes
- Set Row with headers to A1:Z1
- Set Limit to 1
- Click Save
Important: Make only picks up rows added after the trigger was set up. Any rows already in the sheet before you built the scenario won’t trigger it. You’ll need to add a fresh row each time you want to generate a post.
Step 2: Build the Outline Generator (OpenAI Module 2)
- Click the + after your Google Sheets module
- Search OpenAI and select Create a Chat Completion
- Connect your OpenAI account using your API key from platform.openai.com → API Keys
- Set the model to gpt-4o-mini — not o4-mini, not gpt-4o. The naming is confusing but gpt-4o-mini is the fast affordable one, perfect for outline generation
- Set Max Output Tokens to 800
Now add two messages:
Message 1 — Role: Developer/System
You are an SEO blog strategist for Your Site (yoursite.com).
You MUST create outlines strictly based on the exact keyword
given. Never change the topic. Include specific tools, platforms,
and real data in every section description.
Message 2 — Role: User
Click inside the text field, then use the variable picker to insert your Google Sheets data:
Create a detailed blog post outline for the keyword: [map 1.Keyword here]
Category: [map 1.Category here]

Return a JSON object with:
- title: SEO-optimized H1 title
- meta_description: 155 character meta description
- sections: array of 6-8 H2 headings with description and tools
- intro_hook: one punchy opening sentence

Return only valid JSON, no markdown, no backticks.
To map the keyword variable: click inside the field where you want it → a variable picker appears at the bottom of the screen → click Google Sheets [1] → expand it → click Keyword (or whichever column header matches).
Step 3: Add the JSON Parse Module
This step trips up a lot of beginners. The JSON Parse module needs to sit between Module 2 and Module 4 — not at the end of the chain.
- Click the + after OpenAI Module 2
- Search Tools → select Parse JSON
- In the JSON String field, map it to: OpenAI [2] → choices[] → message → content
- Click Create a data structure → Generate from sample
- Paste this sample and click Save:
json
{
  "title": "Sample blog post title",
  "meta_description": "Sample 155 character meta description here",
  "intro_hook": "Sample punchy opening sentence",
  "sections": [
    {"heading": "Section 1", "description": "What this covers"}
  ]
}
Once you save the data structure, Make knows what fields to expect and will expose them as individual variables in the next modules.
If Make shows a warning that says “You’re not using the data generated by this module” — check the Ignore warnings box and dismiss it. This warning appears because Module 4 isn’t built yet. It will go away once the chain is complete.
Step 4: Build the Full Post Writer (OpenAI Module 3)
- Click the + after the JSON Parse module
- Add another OpenAI → Create a Chat Completion
- Set model to gpt-4o — this is the more powerful model for the actual writing
- Set Max Output Tokens to 4000
Message 1 — Role: Developer/System:
You are ghostwriting for Your Name Here, a real woman from Your City who add your personal story here. Write in first person, your style here. Sounds like your style here, not a content farm. Never write fluff. Every paragraph must teach something specific and actionable.Message 2 — Role: User:
Write a complete blog post using this outline:
[map OpenAI Module 2 → choices[] → message → content]

Category: [map 1.Category]
Keyword to include naturally 3-4 times: [map 1.Keyword]

Requirements:
- Each section minimum 200 words
- Name specific tools and platforms with real prices
- Include affiliate disclaimer after intro
- Include TL;DR summary after intro
- Include FAQ section at end with 4-5 questions
- Format in clean HTML using h1 h2 h3 p ul li tags only
- Do not include html head or body tags
- Add META: followed by your 155 character description at the very bottom
Step 5: Connect WordPress
- Click the + after OpenAI Module 3
- Search WordPress → select Create a Post
- Click Add next to Connection
- Enter your site URL: yoursite.com/wp-json/
- For the API Key: go to your WordPress admin → the Make Connector plugin → copy the API key it shows you → paste it into Make
Now map the fields:
- Title → click the field → variable picker → JSON Parse [module number] → title
- Content → variable picker → OpenAI Module 3 → choices[] → message → content
- Excerpt → variable picker → JSON Parse → meta_description
- Type → select Post from the dropdown
- Status → turn on Advanced Settings at the bottom → set Status to Draft
Status must be Draft. Never set it to Published — always review your AI-generated content before it goes live.
The WordPress Connection — What Actually Stumped Me
This is the part that confused me the most when I was setting this up, so I’m going to over-explain it on purpose.
When Make asks you to connect WordPress, it shows you three fields:
- Connection name
- WordPress REST API base URL
- API Key
Here’s where most tutorials lose you — they just say “enter your WordPress URL and API key” without explaining what any of that actually means. Let me break each one down.
Connection Name
This is just a label for your own reference. Call it “My WordPress Connection” or “Your Blog Name” — it doesn’t matter, it just helps you identify it later if you have multiple sites connected.
WordPress REST API Base URL
This is NOT just your website URL. Make needs the specific REST API endpoint, which looks like this:
https://yoursite.com/wp-json/The /wp-json/ part is important — don’t leave it off and don’t add anything after it. This endpoint exists automatically on every modern WordPress site, you don’t have to create it. The version number you sometimes see in tutorials (/wp-json/wp/v2) is the full API path — Make only needs the base portion ending in /wp-json/.
If you get a 404 error after entering this URL, try these fixes in order:
- Go to wp-admin → Settings → Permalinks → click Save Changes (even if nothing looks wrong). This re-registers all WordPress URL routes including the REST API and fixes the majority of 404 errors.
- Double check you included
https://at the start and/wp-json/at the end with the trailing slash. - Test your API is accessible by opening a new browser tab and going to
https://yoursite.com/wp-json/wp/v2/posts— if it loads a page of JSON data your API is working fine and the issue is elsewhere.
API Key
This is where most people get confused because WordPress doesn’t have an API key by default. Make’s WordPress module specifically requires the Make Connector plugin to generate one.
Here’s exactly how to get it:
- Go to
yoursite.com/wp-admin - Plugins → Add New Plugin
- Search Make Connector in the search bar
- Click Install → Activate
- Once activated, look in your WordPress left sidebar for the Make Connector menu item
- Click it — it will display your API key
- Copy that key and paste it into the API Key field in Make
That’s it. One common mistake is trying to use a WordPress Application Password here instead of the Make Connector key — they are different things and Application Passwords will not work with this connection method.
After you connect — map these fields in the WordPress module:
| WordPress Field | What to Map |
|---|---|
| Title | JSON Parse module → title |
| Content | OpenAI Module 3 → choices[] → message → content |
| Excerpt | JSON Parse module → meta_description |
| Type | Select “Post” from dropdown |
| Status | Set to “Draft” — find this under Advanced Settings at the bottom |
The Status field is the most important one. It defaults to nothing which means Make might publish your post live the moment it generates. Toggle Advanced Settings on at the bottom of the WordPress module and explicitly set Status to Draft every single time. Never skip this step.
Once your connection is saved and your fields are mapped, your WordPress module is done. If it shows a red error on the Author field saying “Failed to load data” — just leave the Author field blank. WordPress will automatically assign the post to your admin account and the error won’t stop the scenario from running.
Step 6: Add the Status Update Back to Google Sheets
This step is easy to skip but important — it marks your Google Sheet row so you know which topics have been processed.
- Click + after WordPress
- Add Google Sheets → Update a Row
- Connect to the same spreadsheet
- Row Number → variable picker → Google Sheets [1] → Row Number
- Values → Add item → Column C → type the word Drafted
Now every time a post is generated your sheet automatically updates to show it’s done.
Running Your First Test
Before you schedule this to run automatically, test it manually:
- Add a row to your Google Sheet:
- A2: keyword you are writing for here
- B2: Your Category
- C2: (leave blank)
- Go back to Make → click Run once at the bottom left
- Watch the modules light up green as they process. Each bubble shows a number indicating how many items were processed. If any module turns red it failed — click it to see the error message.
- Go to yoursite.com/wp-admin → Posts → All Posts → you should see a new Draft at the top of the list
- Click it and read through the output. Check the structure, the tone, the accuracy of any claims.
Common errors you might hit:
[429] You have consumed all credits — This means your OpenAI API account has no credits. Go to platform.openai.com/settings/organization/billing and add funds. Remember: your ChatGPT subscription and your API account are completely separate.
[404] Not found on WordPress connection — Your WordPress URL might be wrong. Make sure you’re using yoursite.com/wp-json/ with the trailing slash. Also check that the Make Connector plugin is active.
JSON Parse not showing variables in WordPress — Make sure the JSON Parse module is positioned between OpenAI Module 2 and OpenAI Module 3, not at the end of the chain.
Google Sheets picking up header row instead of data — Check that Table contains headers is set to Yes in your Google Sheets module settings. Then delete your test row and add it fresh as a new row.
What to Do After the Post Generates
The draft that lands in WordPress needs about 15-20 minutes of your attention before publishing:
- Add your personal affiliate links for the specific products you recommend — the AI uses real platform names but your unique tracking URLs need to be added manually
- Add your featured image — use Canva to create a pin-style thumbnail at 1000x1500px using your brand template
- Read through for accuracy — AI occasionally gets specific prices or details wrong
- Add any personal experience sentences the AI couldn’t write — “I’ve been using this for three months and…” type details that only you can provide
- Check the FAQ section and make sure the answers are accurate and complete
The goal is not to publish AI content raw. The goal is to spend 15 minutes polishing a post instead of 3 hours writing it from scratch.
Scaling It Up
Once your scenario is working, here’s how to level it up:
Batch your topics weekly. Spend 10 minutes every Monday adding 5-7 keywords to your Google Sheet. Schedule the scenario to run daily at 6am. Wake up to a new WordPress draft every morning.
Add a Pinterest copy module. After the WordPress module, add another OpenAI call that generates your Pinterest title, description, and three pin headline variations — all automatically saved to a separate Google Sheet tab.
Add category-aware prompting. Make your system prompt category-aware so wellness posts get supplement and product recommendations, while make money posts get platform and income data. Just reference the Category variable from column B in your prompts.
- Replace your current Module 3 System prompt with this: You write across four content categories and must adapt your content approach based on the category provided: List categories and the description/instructions for writing that you want for each.
- Then update the first line of your Module 3 User message to this: Write a complete blog post using this outline: [map OpenAI Module 2 → choices[] → message → content] Category for this post: [map 1.Category] Adapt your content approach, tone, product recommendations, and data points to match the category guidelines in your system prompt. Keyword to include naturally 3-4 times: [map 1.Keyword]
- You never touch the prompts again. The only variable is what you type in Column B.
Switch to Claude API for better writing quality. If you find the output needs heavy editing, the Claude API produces more natural, publication-closer content. The setup is identical — use an HTTP module pointed at api.anthropic.com instead of the OpenAI module.
How Much Does This Actually Cost
- Make.com free plan: $0 (1,000 operations/month — enough for 200+ posts)
- OpenAI API: roughly $0.05-0.10 per blog post
- WordPress hosting: whatever you’re already paying
- Total per post: less than a cup of coffee
The ROI math is simple. If one blog post earns $5 in affiliate commissions over its lifetime and costs $0.10 to generate, you’re running at 50x return on your content spend.
FAQ
Do I need to know how to code to build this?
No. Make.com is entirely visual — you drag, drop, and fill in fields. The only technical part is pasting prompts into text boxes, which is no different from using ChatGPT.
Is the content good enough to publish as-is?
Not quite — it needs 15-20 minutes of editing per post. The AI gets the structure, research, and bulk writing done but you need to add your personal affiliate links, verify any specific claims, and add your own voice in key spots.
What’s the difference between the OpenAI API and ChatGPT?
ChatGPT is the consumer product at chatgpt.com. The OpenAI API is the developer access at platform.openai.com. They use the same AI models but have completely separate billing. Having a ChatGPT Plus subscription does not give you API credits.
Can I use this for any type of blog content that my blog focuses on?
Yes — just change what you put in Column B of your Google Sheet. The system prompt is written to adapt based on the category you specify.
How long does the scenario take to run?
About 60-90 seconds per post from trigger to WordPress draft. The two OpenAI calls are the slowest part. You can kick it off and come back to the draft ready to review.
If you build this scenario and get stuck anywhere, the most common fixes are: checking that your variables are mapped as green pills (not typed as plain text), making sure the JSON Parse module is in the right position in the chain, and verifying your OpenAI API account has credits.
Save this post and come back to it when you’re building and reach out to me if you need help with this automation!! eblissdesigns@gmail.com
Follow along for the next part of the series where I add Pinterest pin automation and social media captions to the same scenario!!